Conditional Logic with Caldera Forms in WordPress

The general rule for building forms is that you should have as few fields as possible, as too many fields can lead to a drop in conversions. But you also have to avoid creating a form that doesn’t gather the information you need. This is where the conditional logic in WordPress form builders is so great — your form can tailor itself to the exact needs of the person filling out the form.
If you’re looking for a powerful and free conditional logic from a WordPress form builder plugin, Caldera Forms is a great choice. Caldera Forms has a page builder-like drag-and-drop interface and an intuitive conditional logic system. As a free alternative to Gravity Forms and Ninja Forms, Caldera Forms conditional logic is a free feature.
Conditional logic allows form fields to show, hide or be disabled based on conditions being met. Also, you can achieve complex uses of conditional logic such as complex autoresponders, calculation fields, custom animations. With Caldera Forms, you can even use conditional logic to customize email recipients based on user input. The latest version of Caldera Forms allows you to save and view all the changes you’ve made to your form as well.
This tutorial will show you how and we’ll use some examples. Let’s get started.
Hide And Show Fields Based On The Number Of People Registering For An Event
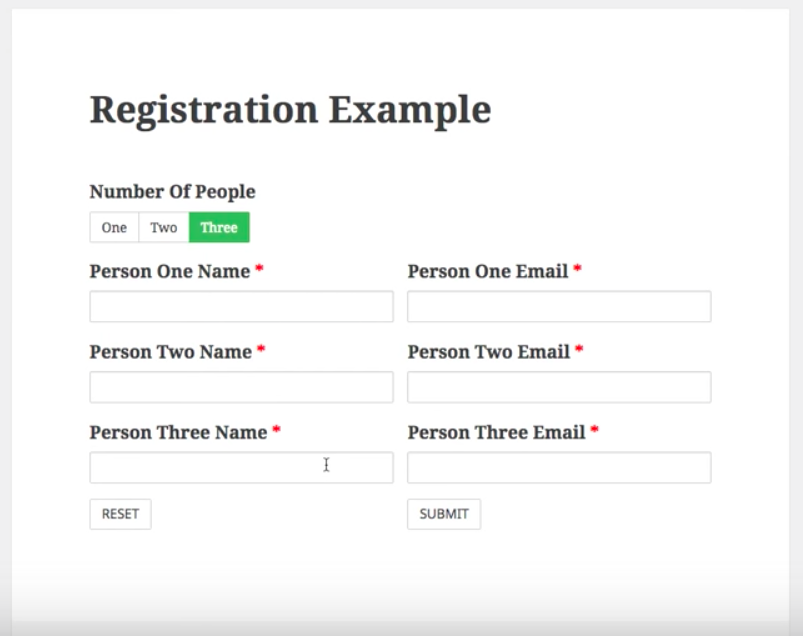
Let’s say that you want to build a registration form where the number of fields appearing can change based on the number of people like shown in the pictures below. Caldera Forms Conditional Logic can do that.


To start, go to the Caldera Forms admin page and click the New Form button. This brings up a selector for form templates. “Registration Form – with optional additional participants” template is a great example of how to use conditional logic. But for this tutorial, choose “Blank Form” so you can learn all of the steps.

Then, add all the fields you need. In this case, add all the fields for three people to register. To add a field in Caldera Forms you drag the Add Field button into the form layout grid. The form layout grid is like a page builder that you can divide up into rows and columns.
For this form, let’s use three rows. The first row will be to ask for the number of people registering 1, 2 or 3. The second row will be for the details of each person, we will use the conditional logic on these fields. Then the third row will hold on our submit button.
By default, the form has one row. Below that row is a big plus button. When you hover over that plus with your mouse it will say “Click to add a new row to the layout.” Click that twice to add two new rows.

Now click and drag the Add Field bar into the first row. This will bring up the field chooser. Caldera Forms has a lot of field types. They organized into five categories you can choose from on the left side of this modal.
A toggle switch is a great choice. These fields look like a button group but act like a radio field. Click the select option on the left side and then find Toggle Switch and click the Set Field button.

This adds the field to the form and brings up the field’s settings on the right-hand side. Give the field a name “Number Of People.” Caldera Forms has a ton of options for choosing the options of a select field, but we will just add three simple options. At the bottom is a button called Add Option. Click that three times. In the value settings for the first option enter “One”, in the second – enter “Two” and in the third – enter “Three”.

In this form, we’ll ask for each of the three people’s name and email. To make it look nice and organized, split the second row into two columns by clicking hovering over that row and then clicking the button at the top of the row with two arrows. This splits the row into two columns. You can split the row up to twelve times. Because Caldera Forms is responsive, on mobile devices the grid will collapse into one column per row so your forms look and function great on mobile and desktop.
Now, add six more fields. Just like before, drag the Add Field bar into the grid where you want it and choose the field type you want. But this time, use a “Single Line Text” field and put it in the left-side columns and choose “Email” field and put in in the right side column. Call the single line text field “Person One Name” and the email field “Person One Name”. Then repeat for three people. Make all six fields required by checking the Required setting for each field.

We’re making each field required. Don’t worry if the fields are hidden based on conditional logic, they will not be required. Let’s create that conditional logic. Click on the Conditionals tab to go to the conditional logic builder.
When you first go to the Conditionals tab and there are no conditionals in the form, the Add Conditionals button will be blinking, calling out to you to click it. Do what it wants, click that button.
When you click the button a new conditional group will appear and you will need to name this group. Call this group “Three People”. The goal of this group will be to get the field for person three to show if the number of people is three. There are three types of conditional groups:
- Show – This type shows fields when the conditions are met.
- Hide – This type hides fields when the conditions are met.
- Disable – This type disables fields when the conditions are met.
For this group, choose the Show. Then click the Add Conditional Line. In the line that shows up, you choose, from left to right, the field to base the condition on, how to evaluate the condition — is, is not,, greater than, less than or contains — and what value to evaluate the condition against. So choose for the field, “Number Of People”, then “Is” for the comparison and then select “Three”. On the right side, you choose which fields this affects. Choose the fields for person three.

That conditional group will make it so the fields for person three show only when the number of people is three. Right now, the fields for person one will always show, which is good, but also the fields for person two will show and that’s a problem. A problem we can solve with one more conditional logic group!
Click the Add Conditional Group button again and give this group the name “Two People”. It will also be a show group. This time we will need to base the conditional logic on two different values of the Number of People field, so click the Add Conditional Line button twice to add two lines.
Your first line will be identical to the last line we created in the other group — if Number of People is Three. In the other line, it will be similar, but we will use if Number of People is Two.
Because these are two different lines, the conditional will be met if line 1 OR line 2 is met. This condition acts if Number of people is Two or Number of People is Three. If you wanted an “and” condition, you would click the Add Condition button within the line. You can combine multiple ANDs and ORs based on different fields and get really complex.
Before you leave this conditional logic group, make sure to assign the person three fields by selecting them on the right under Applied Fields.

Almost done. We just need to add a submit button. Go back to the Layout tab and drag the Add Field bar into the third row. Choose a Button field from the Basic category. Caldera Forms buttons can be submit buttons, next page or previous page buttons — for multi-page forms –, reset buttons or generic buttons. In this case, leave the field as the default button.
You should name this field what you want the button to say. For example, you might want to name it “Sign Up” or some other call to action.
Click the Save Form button at the top of the form and then you can use the Preview Form button next to it to see the form in action in the front-end.
Sending Conditional Auto Responder Emails
To continue with this registration example, let’s say that you want to send a different automated message to each person who has registered, we can use conditional auto-responders for that, Caldera Forms Conditional Logic is available both for fields and processors.
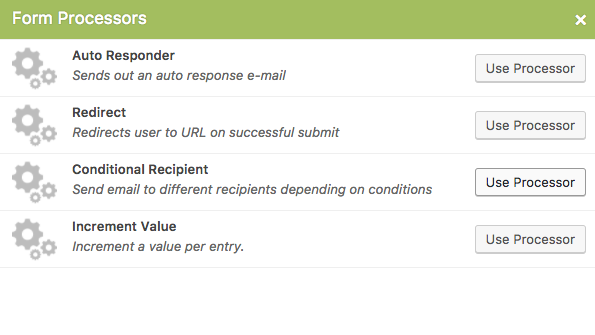
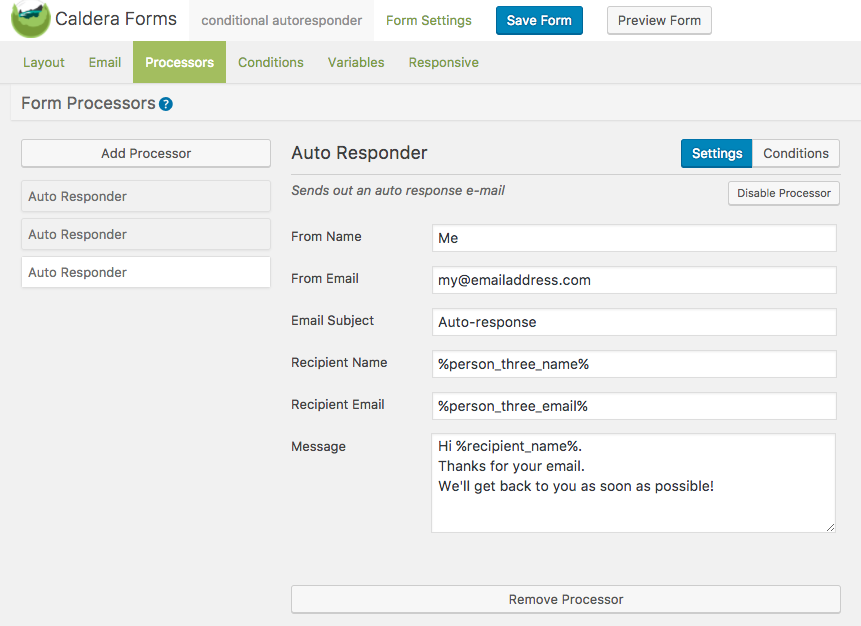
This will allow us to send an email to person two if there are two people registering or to person three if three people are registering. After you build the form, click the Processors tab and Add Processor button. This will bring up the processor chooser. When you see the Auto Responder, click Use Processor.

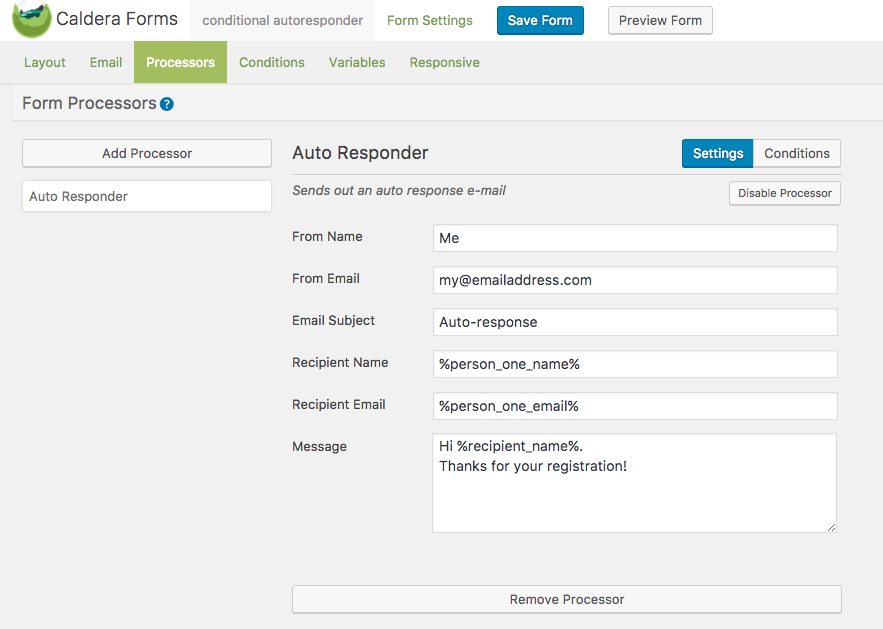
After adding Auto Responder, you’ll see the Settings page by default. The field after From Name will be the place to put the name of the person or company that the email will appear to have been sent from. The Recipient Name is the place for the name to whom you want to send an email. You can type in the recipient name and email address, or save some job by selecting %person_one_name%. %person_one_name% is the magic tag that will be replaced with the value of the field “Person One Name”. Similarly, %person_one_email% will be replaced with the value of the field “Person One Email”. Next, you can edit the email content in Message field.
Since this email will always be sent, we don’t need any conditional logic, but the other two auto-responders we’re about to add will.
Next, let’s find out how to do that when the number of people is two! Now that you have the first Auto Responder, you just need to add another one for “person_two”. Click on Add Processor button like you’ve done before, choose Auto Responder and edit email content under Settings. Since this message is only going to “perosn_two”, just choose %person_two_name% and for Recipient Name and %person_two_email% for Recipient Email.

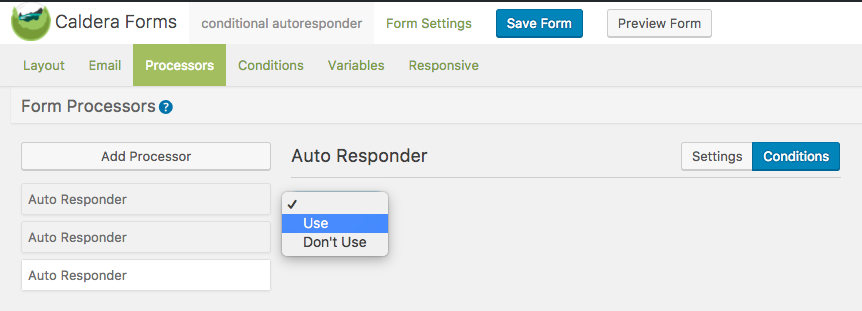
Each Caldera Forms processor has a conditionals tab that works just like the conditional logic for fields we looked at before. The conditional group will make it so the email is sent only when the conditions are met.
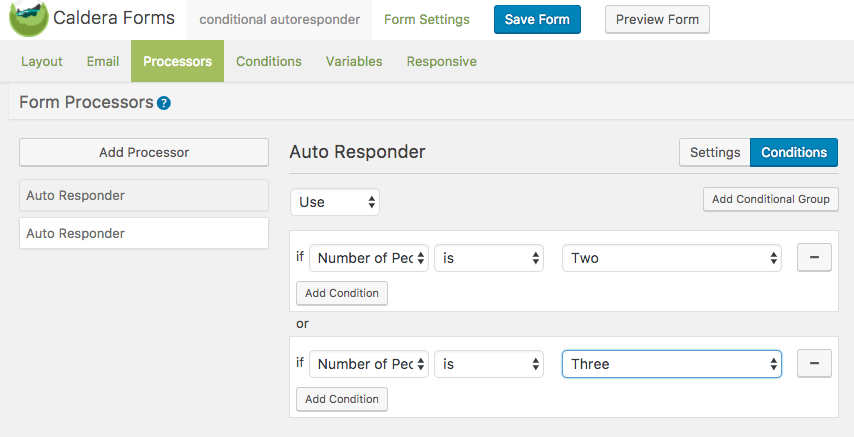
After you’re done with the settings, click on Conditions. Just like before, choose Use, then Add Conditional Group. For the email going to “person_two”, since the information of “preson_two” appears when the number of people is two and when the number of people is three, the email will go out under these two conditions. Therefore, you can set the condition as “if Number of People is Two”, then click on Add Conditional Group, and set another condition as “if Number of People is Three”. These conditions will make it so that this email will be sent to “perosn_two” when the number of people is two or three.
Additionally, you can add conditions by clicking Add Condition button under “if” statement. The difference between this and Add Conditional Group is that Add Condition will add additional conditions, which means the email will only be sent when all the conditions are met. If you want to delete any condition, click “ – ” button on the right.

Now you’re done setting the second auto responder. The next and final step is to set up the third auto responder to send an email when a number of people are three. Don’t worry, there’s nothing new for this step and it’s a perfect chance for you to practice what you’ve done before. As you’ll get the information of person_three only when the number of people is three, just set the condition as “if Number of People is Three”. Forget how to do that? Never mind. Let’s go through it together one last time.
Click on Add Processor button on the left, and select Auto Responder. By default, you’ll go to the setting page where you can edit the email content. Since this one is going to person_three, enter your name for From Name and your email address for From Email. Then double click to select %perosn_three_name% for Recipient Name and %person_three_email% for Recipient Email.
After done editing email message, click on the Conditions button on the right next to Settings button. Choose Use in the dropdown menu, then set the condition as “if Number of People is Three”. This will make the third auto responder send this email to person_three when the number of people is three.

Once you have gone through all these steps, click the Save Form button at the top of the form. Then, you can use the Preview Form button next to it to see the form in action in the front-end.
Conditional Logic Is A Powerful Feature of Caldera Forms
If you’ve never used Caldera Forms, you might be shocked that conditional logic is a free feature. None of the other major form builders include conditional logic in their free plugin. With this great feature, you can build custom registration forms, payment forms with multiple payment methods and any other type of forms you or your clients need.
hello, superb plug-in, btw, i have problem, im making early bird fee form, i want to hide early bird fee , if the date purchased is exceeded on the date given to date picker. what is the conditional setting for that. thanks a lot
how to make it that button show up only if file is upload or field isnt empty
Hola, excelente formulario, he creado comparadores complejos, solo hay algo que parece no funcionar, la condicional “desactivar” parece no funcionar, he hecho diferentes pruebas sin ningún resultado, quizás haya alguna opción de pago para que funcione?
Dejo un ejemplo de uno de los comparadores que he creado.
Hello Sir,
I wash clothes for customers. I do Drycleaning Service.
Now, for record purpose, I want my customers to fill a Form, and this form will indicate how many clothes they are giving me to wash. It will also indicate the different Types of clothes they are submitting to me at a particular point in time.
The fields on the Form are:
1.) Serial Number: Auto-generated
2.) Title: Text
3.) Item Description: Text Area
4.) Item Type: Select
5.) Quantity: Number
6.) Featured Image: File Upload/Picture
7.) Submit: Submit Button
Those are the basic Form Information.
[b]THE CHALLENGE[/b]
If you take a look at the above form, you will notice that the user can only submit different quantities of one item Type.
But a user that wants to submit different quantities of different item Types will find it difficult using this form.
[b]MY QUESTION [/b]
How do I achieve it, in such a way that when the user fills this form for one item Type, the user can have a button that says “Add New Item” and when the user clicks that button, the same fields are duplicated again for the user to fill again and enter new item Type with the same field Types.
Then again and again and again,the user can repeat or duplicate these fields to have an unlimited chance to fill an unlimited number of items as they so please.
How exactly do I achieve this using Caldera Forms?
Waiting to hear from you soon.
Regards
The solution is called a Repeatable Group or Repeatable Field. All the documentation that I found, states that Caldera forms can NOT do “repeatable fields” or “repeatable groups”.
You might try to:
1) Add a predetermined number of Item Type and Number Fields, say 5 and then put conditions on each one, so the extra fields only show up if certain conditions are met. [Refer back up to the Add Field section of this blog post.]
2) Use an Add-on such as [url=https://www.advancedcustomfields.com/resources/repeater/]ACF Repeater Field[/url].
3) Buy something like [url=https://os.wordpress.org/plugins/formidable/]Formidable Forms Pro[/url] version. It’s a good solution and has repeatable groups built-in along with a ton of other options.
Hope this helps.
Hi there, one example is OK but not enough for me… I simply try to show a html field if a button field is clicked. So I have changed the button type to “button” and tried to add a conditional logic. But I can’t select that I simply want a click to show the field. There are just a huge amount of {entry_id} and so on which I do not understand. Is that possible to do anyhow?