Reusable Images and Files with Media Bundles in Drupal 8

This week, an OSTraining member asked us how they could re-use media in Drupal 8.
Using the Drupal media modules, I will explain how you can upload PDFs, images and other media that can be re-used on your site.
In this tutorial, we’re going to rely on the Media module.
Update: the Media modules are now moving to the Drupal 8 core.
Step #1. Install the modules
In order to get started, you must download, install and enable the following modules:
Step #2. Create a media bundle
- Go to Structure > Media Bundles > Add Media Bundle.
- Give the bundle a name.
- Leave the “Type provider” as “Generic media”. This will allow us to work with any file type we choose.

Now we have created the bundle we need to add a field to it.
- Edit the new bundle you created.
- Go to Manage Fields > add field
- Under reference, choose “File”.
- Enter a label for your field and click “Save and continue”

- Make sure “Enable Display field” is checked.
- Make sure “Files displayed by default” is checked.
- Set “Allowed number of values” to “Unlimited”.

Now we can define which file types we want to be usable with this field. In the example, below the default is “text” and I have added PDF and JPG.

Step #3. Attach the media bundle to a content type
We have a media bundle, we need to attach it to a content type. For this tutorial, I will add the bundle to the Basic page content type.
- Go to Structure > Content types > Basic page > Manage fields
- Click “Add field”
- Under “Reference” choose “Other…”
- Enter a label for your field and click “Save and continue”

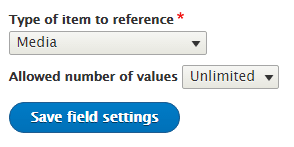
- On the next page, under “Type of item to reference”, choose “Media”
- Set “Allowed number of values” to “Unlimited”.
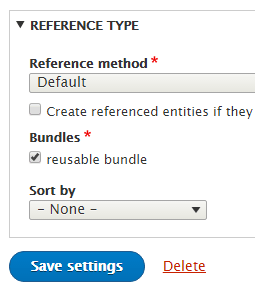
- Under “Bundles”, select the media bundle that you created.
Step #4. Configure the media display
Now we need to configure the form display for the media.
- Go to the “Manage Display” for Basic page.
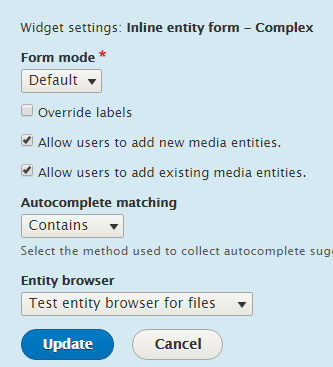
- Change the widget to “Inline entity form – Complex”.
- Select “Allow users to add new media entities”.
- Set “Entity browser“ to “Test entity browser for files” select update.
Step #5. Create content
- Go to Content > Add content > Basic page.
- You can now see your new media field. You can choose “Add media” to upload new media or click “Select entities” to select existing media.

- If you choose “Select entities”, you will be able to browse through previously uploaded files.
- Save and publish your content. Your chosen media will be attached to your content!

Do you know why “Number of allowed values” has to be chosen twice?
Once for the bundle type and once for the entity type. I hadn’t actually thought about it till you asked though.
Still doesn’t make sense to set it two unlimited twice though (IMO) :s
The bundle acts as a container. I guess if you make the media unlimited and have it work with all file types you don’t need to set the bundle to unlimited but I prefer to keep my options open.
Thank you for this usefull article. I cant find the widjet setting for the media , step #4
problem solved – inline entity form module was disabled, thank you for your time!!
Can you explain how to get the thumbnails to work? I am seeing the generic icon for file.
Same problem for me.. the generic icon is displayed. Did you find any solution?
Hello 🙂 Is there a way to edit particular image.html.twig of this particular media entity bundle (saved in specific field)?