Move A WordPress Site From Localhost To Production

So you have everything ready for launch and your site is sitting on your local computer. You’re ready to move WordPress to the “real” server and start publishing.
Here’s a step-by-step tutorial on how to export and import your data base, and get WordPress running on the new server.
Step #1. Prepare for the move
Make sure you have your website working perfectly on your local machine.
We are assuming the local environment is either a PC or Mac on which you run a web server (like XAMPP or WAMP) with PHP and a MySQL database and you have access to phpMyAdmin on localhost.
Have these access details handy:
- FTP details – Hostname, username, password
- access to phpMyAdmin on local host
- access to phpMyAdmin on the destination server
- database server name on destination server
Database Information on destination server:
- database name
- database user name (User must have full permissions)
- database password
Checklist of steps to complete
- Search and replace http://localhost/yoursite with http://www.yoursite.com
- Export your local WordPress database to a text file.
- Create a database on your destination server and import your database.
- Copy all files from your local machine to destination server and amend wp-config.php file with new database details.
The easy way to do this is to go to Settings > General and change the WordPress address (URL) and the Site address (URL) to http://example.com. Or if it’s going to be in a subdirectory, use http://example.com/subdirectory.
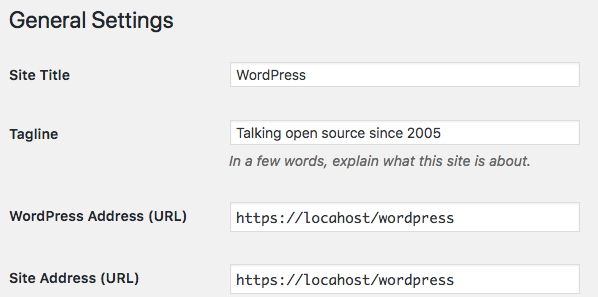
Save the changes.
You could also export the data base, then use a text editor to do a global search and replace for the URL.
THIS WILL GIVE YOU AN ERROR MESSAGE – but you can ignore it for now.
After you change the URL, if you try to visit your localhost/wordpress site, You may see only text or nothing, this is normal, since you have changed the URL, wordpress is looking for everything on the server, which is not ready yet.
Step #2: Go to phpMyAdmin

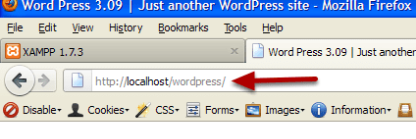
Depending on what local version you are using, find phpMyAdmin and open it. Here we’re using XAMPP and you can get to the XAMPP menu by typing http://localhost in your browser address bar. Or you can get there from the XAMPP control panel by clicking Admin next to MySql.
In your phpMyAdmin control panel choose the correct database from your list of databases on the left. You created this data base and named it when you first installed WordPress in XAMPP.
Double click the name of the data base you want.
Step #3: Export the database

- Click the Export tab.
- Select All the database tables in the selection box.
- Choose the type of file you want to export.
- The default choices on the right hand side of the page will be OK.
- Scroll down.

- At the bottom, give file a name in the File name template field
- Choose a compression type. zipped or gzipped are most used.
- Click Go to start the export.

- Save the file to your computer.

- Save the file, you don’t need to open it. You’ll be using phpMyAdmin to import it to the destination.

Be sure to save it in a folder where you can easily find it. You will be importing this file to the server using phpMyAdmin on the server.
Step #4: Create a database on your new server

How you do this depends on what type of server control panel you have. You will need to check with your web host if you are not certain how to do this. Once you have created it, make sure you write down the data base host, data base name and the data base username and password . You will need them later.
Open phpMyAdmin on the destination server.
Your server control panel will have links to a way to create the data base, as well as a way to manage the database once it’s created.
Step #5: Import the database

- Click on the name of the one you wish to create, and make sure you are working with that database. There may be only one database, or if you do more than one website, you could have a list.
- Browse for the file and import it into your new database.

- Click the Browse button and find the file you saved on your local computer. Click the Go button, which you will find at the bottom of the screen to import the database.

- You’ll get a success message.
Step #6: Upload the WordPress Files
- Use an FTP client to login to your server.

You should already have created the account on the server, and you have the login details from your hosting company Your FTP server (usually your domain name), your username and password.
The image above shows what the FTP connection screen looks like in Filezilla. If your domain name has not been propagated yet, you can also use the server IP address in the host field. I like to keep notes about my control panel access in the comments so I can find them easily.
Upload the entire contents of your local WordPress Installation from your local machine to the remote site.

In most cases you will want to upload everything, pictures, files and all directories to the /public_html folder on your server. Some hosting companies use /www as the place to put your web files. If you want to put it into it’s own directory you can read more about it in the codex.
You will find the files to upload inside a folder in \xampp\htdocs\wordpress\ on your local computer. I named the folder wordpress, your folder name is whatever you created when you installed the site.
Step #7: Create the connection to your database

Open your wp-config.php file, located in the main WordPress directory in the new location, in a text editor and look for the section with the database information. You will see whatever you had set for the data base on your local server. Change this to the data base information for your new server (hopefully you recorded it when you created the data base. It should look something like this.

Different hosting companies use different naming conventions for usernames and passwords. Check with your hosting company if you need to.
Some hosting companies will use localhost for the MySQL hostname, and you won’t need to change it. Some, like GoDaddy, use different servers for the data base and you won’t be able to use localhost. You will need to check with your hosting company for the correct information.
You should now see the WordPress site in it’s new location!
Step one created some big problems. You mentioned it will crash the local site. You didn’t tell me how to bring the local site back up after things have moved. I need it for settings on plugins, widgets, and such. Plus I want to continue using it as a testbed. Help!
Hi and welcome, Tom!
Sorry for the inconvenience, but if you’re a student at OSTraining, could you copy and paste this into the support forum so one of our support techs can look into it for you? All you have to do is log in at [url=http://www.ostraining.com]www.ostraining.com[/url] and click on Support Forum in the main menu.
Please see the support FAQ for more information:
[url=http://www.ostraining.com/support-faq/]http://www.ostraining.com/s…[/url]
Kind regards,
Nick
I don’t think Tom needs this information anymore, since he posted that question 3 years ago 🙂 but this is for other people like him and myself who have met this problem:
I found this link ([url=http://codex.wordpress.org/Changing_The_Site_URL)]http://codex.wordpress.org/…[/url] useful. I preferred to change the addresses back manually through phpMyAdmin. Change values of wp_options.siteurl and wp_options.home to your orginal settings (eg. “http://localhost/wordpress”).
After I did this everything almost worked, but all other pages than index (frontpage) brought 404 error, and even though address localhost/wordpress/login had worked before, now I had to use localhost/wordpress/wp-login.php to get to the admin panel.
The problem was fixed (solution: [url=http://www.wpbeginner.com/wp-tutorials/how-to-fix-wordpress-posts-returning-404-error/)]http://www.wpbeginner.com/w…[/url] by going to Settings > Permalinks and just clicking “Save changes” (even though you didn’t change anything). Now the pages work again.
I found your tutorial very helpful, thanks. I was trying to do it the other way round, i.e. move an existing wordpress site to xampp for tuning up and experimenting. However, I wasn’t able to do it even though I exported the databased from the server and imported it via PhpMyAdmin in xampp. Do you know if it is feasible at all and, if so, how the wp-cofig.php file should be configured?
Hi Kalina,
You’re welcome! Yes, it’s possible and your wp-config.php file just needs to be configured in the same way. For xampp, try the user “root” and no password.
Kind regards,
Nick
Thank you for this great tutorial. I save lot of time and everything work just perfect. Great!
Best wishes,
Andrius.
You’re very welcome, Andrius! 🙂
There’s a lot more great tutorials available inside to members if you’re interested in learning more:
[url=http://www.ostraining.com/online]www.ostraining.com/online[/url]
Kind regards,
Nick
Hi.
Wouldn’t it be a lot more simplier, and with far less steps just to use the BackupBuddy Plugin ?
Cheers,
Sure, but at $75 you pay for convenience.
I followed everything to the letter – got right to the last step, and when I try to connect I just get:
“Error establishing a database connection”
– on both remote AND local version of my site. Freaking out 🙁
Hi Duffter,
It’s likely that your database settings are incorrect. Make sure that you’ve spelled and correctly capitalized everything as well as prefixed the account prefix if necessary (e.g. cpanelusername_databasename)
Kind regards,
Nick
Hello!
Awesome article and i wish you the best of luck, you saved my dag and a lots lots of time.
Kind Regards
Johan
After step 2 and 3 WordPress is still tying to load pictures from localhost. Any idea why?
For anyone who has followed step 1 and then found they have encountered problems accessing their locally hosted website then use the following tutorial to recover it under the heading Changing the URL directly in the database:
[url=http://codex.wordpress.org/Changing_The_Site_URL]http://codex.wordpress.org/…[/url]
I have spent approximately 2 hours trying to retrieve my website due to the problems I encountered at step 1 as the sql zip file encountered errors once I tried to upload to the myphpadmin area in the control panel.
Thanks so much for this tutorial! Exactly what I needed!
Thanks for the clear instructions. I’ the kind of person who does my own web creation and management, but I’m not a web designer or developer. So I only do this procedure once every few years and always have to look up the steps again. I particularly appreciated knowing that you can handle changing the site URL by using the general settings, rather than search and replace procedure.
how about wamp? I could not find the config.php file…where I can fix it to connect mydatabase to the server?
Hi
I did all the step successfully.
But on website its not turning up.
Please guide.
Thanks,
thank you so much!!! spent hours trying to figure this out….
Brilliant. Worked first time. Most pleased.
nice tutorial……thank you so much.
Thanks a lot for this great tutorial that just saved my day.
I managed to upload my local WP website to its final location, see for yourself >> Le Coin des Bois.
Coming from Linux, who should own the files deployed on the server? Root, user, nobody? What about the group. In development, I have set ownership to [user]:www-data.
Thank you. A brilliant concise tutorial. Worked perfect.
It was interesting to note that my DB name had to be in uppercase.
Brilliant! You make difficult things SIMPLE. I am a designer and not a programmer so I really appreciate your approach.
Hey! It’s great
Worthy Info
Great Tutorial
How works for MultiSites ?
Thanks in adv.
Very helpful – love the step by step and the screenshots.
question: i went through this process but due to weird sql set up on the server, had to fresh install wp on server. Now i want to go back and export an xml of my site files, but as you know localhost/wordpress won’t bring it up. How can i get back into my local site??? Help! Thanks
In witch folder should the sql file be?
my host don’t have “MyPhpAdmin” on his server, so i import this file, – but where it should go?
THX!
You saved my life! 🙂
It was an amazing tut!
Many thanks for this – tried the ‘search and replace’ method for the url yesterday and got into a mess. Even many of those advocating that method point out a number of potential pitfalls. Your method worked straight off so I’m going out for a cake now!
How can we revert back the URL once we replace it? My local site isn’t working anymore but I still want to update some parts. Thanks.
dear nick
your article is very useful today i successfully update from xampp to online. now i want to do edit some pages offline in xampp but after edit the wp-config.php it dos’t work in login so please help me how can i edit online or offline . i shall be very thankful to you.
THANKS!! You saved my day! Awesome tutorial 😉
Guys, if you are having trouble to make your site working back on localhost, just do the following:
– Find the file “functions.php” inside your theme’s folder, on localhost (the theme that is currently in use). It should be in somewhere like this: \www\wp-content\themes\YOURTHEME\functions.php
– Open this file on notepad or any software where you can edit it, and add the following lines, right after the initial ”
– Save the file, turn off your WAMP server and back on, then try to access (the site and the admin page, on localhost). It should work now.
REMEMBER: After you succeed accessing your site, go back on the file and remove the lines you added. If you created the functions.php file, delete it. It will still work, but leaving those lines there might not be good, trust me. Even after you remove them, you’ll still have access.
Hope this helped you guys, I actually spent a really long time to reach that.
I´ve created wordpress site and all is working perfectly even after moving it to the windows server 2008. can u tell me how can I control the apache to give an access to call the site from external too ?
cant find the file stated on No. 7
HELP
step 1 causing local site to be unaccesible, what a terrible tutorial.. 🙁
I’m in the process of finishing my local wp site and thus after that, will be putting it online through this tutorial. How do I proceed to alter the content of the site after putting it online? Do I install wp on the webserver? Thank you for your reply.
Sir,
I am having a Webserver, Static IP address, Domain Name and Firewall.
I have developed a website locally on WordPress and XAMPP.
My website can be viewed on my webserver.
But, I am not able to show my website to the public.
Please help me at this situation.
With regards,
S.Thanapaul
Dear Sir, i have build a html website and i have used Xampp to create my databse behind it.
i use php files to conect and insert records to database,
now that i import my databse to the specified server how to conect my databse and change the commands ?
because i have use (localhost,root,””) in all php files in my local Xampp server in my PC.
thanks
Thank you very much for this tutorial. It was very helpful, invaluable to me.
Pls I need help to view and edit my filezilla online,because it brings an error message anytime I try to view and edit dreamweaver file on filezilla.The errors says the file index.php cannot be open,pls check your filetype association.but the file open on dreamweaver on my desktop.
Hi. I’m getting trouble in the end, when editing wp-config.php! I did all the steps, and when i moved all the files with the FTP client, and edited the wp-config.php, my site keeps “waiting”, and don’t open anything. Can you help me with this situation?
Thank you!
is there a way i can change the address of fileuploads from localhost to ipaddress?