What are Custom Taxonomies in WordPress?
Taxonomy is a common word in biology. In science, it’s a hierarchy of terms used to classify almost everything. Wikipedia has a full explanation here.
WordPress has adopted the word “taxonomy” as an additional way to organize information. It’s an uncommon word for a common concept.
When you were in school, you picked up a book and opened to the table of contents, and you were looking at the book’s taxonomy. It’s just a way to classify and label things. In a web site, it makes it easier to find thing or show them when you need them. Here’s how it applies to WordPress…
What are the default WordPress taxonomies?
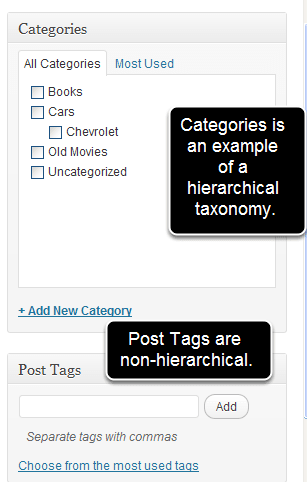
WordPress has two taxonomies that you’ve probably used already.
- Categories. The ‘category’ taxonomy lets you group posts together by sorting them into various categories. These categories can then be seen on the site by using ‘/category/name’ types of URLs. Categories tend to be pre-defined and broad ranging. You can have top-level categories as well as sub-categories and sub-sub-categories.
- Tags: The ‘post_tag’ taxonomy is similar to categories, but more free form. Tags can be made up on the fly, by simply typing them in. They can be seen on the site in the ‘/tag/name’ types of URLs. Posts tend to have numerous tags, and they are generally displayed near posts or in the form of tag clouds.
There is also “Post Format” and some other taxonomies that work behind the scenes in WordPress. However, Tags and Categories and the main taxonomies you will use. The TaxoPress plugin has a “Taxonomies” screen can show all the taxonomies created by WordPress and your plugins and themes. Here is that screen on a basic WordPress site with no extra plugins installed:

Custom Taxonomies in WordPress
WordPress has the ability for you to break out of these basic taxonomies. No longer are you stuck with just Categories and Tags.
Why would you want more taxonomies? If you were creating a list of movies, for instance, you might want to add Actors and Directors to each post, as in the image below:

You can use these new taxonomy for anything. Here are some common examples:
- If you’re making a product catalog you could add color, size, and price.
- In a staff phone book you could have each person’s Department, Title, Phone.
- I’ve seen it used for car dealership websites to add make, model, year and other information about cars.
Create a Custom Taxonomy With a Plugin
TaxoPress is one plugin that allows you to create and manage all the taxonomies on your WordPress site. The “Taxonomies” screen will show Tags and Categories, plus also taxonomies from WooCommerce and other plugins.
On this Taxonomies screen, you can click “Add New” and create your own taxonomies.

When you click the “Add New” button, you’ll be able to choose settings for each taxonomy. For example, you can change the visual labels, or you can control whether the taxonomy is organized in parent-child relationships. Here you can also describe what your taxonomy is used for. There’s also the option to add default terms for this taxonomy.

In the “Post Types” area, you can assign this taxonomy to any post type, as in this screenshot below:

After saving this custom taxonomy, you will be able to add terms to this taxonomy using the new metabox inside your posts, as in this screenshot:

Creating a Custom Taxonomy with Code
It is also possible to create a taxonomy by writing a few lines into the theme’s function.php file or you can use a plugin.
Step 1: Edit your functions.php file
You can edit it by going to Appearance > Editor > Theme Functions (functions.php) or you can use FTP to download and edit the file.
The functions.php file you need to edit can be found in the theme’s directory. If you don’t have one, you will need to make one. A typical path would be [website_root]/wp/wp-content/themes/twentyten/functions.php.
There is a functions.php file in your main WP directory. DON’T edit that one.
Step 2: Add the hook
// Custom Taxonomy Code Starts here
add_action( ‘init’, ‘build_taxonomies’, 0 );
Add this line to the bottom of the functions.php file. This hooks the ‘build taxonomies’ function to the ‘init’ event. Basically this is the kick starter for the function. You could put this anywhere in the file, but I’m putting it right above the function to keep things in logical order
Step 3: Build the function
function build_taxonomies() {
// code will go here
}
This actually builds the function. You’re going to replace “//code will go here” with the code that describes and controls it. Now you just need to register the taxonomies.
Step 4: Register the taxonomies
You will be adding code similar to this in the functions.php file. Replace “//code will go here” in the example code above.
- register_taxonomy( // starts the registration
- ‘color’, // This is the name of the taxonomy in the database. No capitals, spaces or punctuation.
- ‘post’, //This is type of content that will use the taxonomy. You could have more than one ‘post,page.custom’
- array( ‘hierarchical’ => true, // If true, will be multi-level like categories. If False will be single level like tags.
- ‘label’ => ‘Color’, // This is the name that will be visible to the public
- ‘query_var’ => true, //Allows you to search for any entry with ‘color’ attached.
- ‘rewrite’ => true ) ); // allows creation of search engine friendly URLs
There are a few more parameters that can be defined for a taxonomy. You can get a complete list and more details in the codex.
Step 5: Repeat for additional taxonomies
Repeat the code used in Step 4, but change the name of the taxonomy, the type if needed, and the label. You will be able to create as many of these as you want. Above is what the code would look like for multiple taxonomies.
Step 6: Check the taxonomies are active
The final step in this process will be to login to your WordPress site and check that the taxonomies are available inside posts.
You posted the code as images rather than text that readers can copy and paste to try out??
Thanks Nathan. We’ll make adjustments for future versions.
Kind regards,
Nick
Thanks Nick! I noticed the tutorial left out an example of how to display the taxonomy once it’s been created. It works in the Admin, but there’s no info on how to output the items onto the site.
Can you post the snippet of code needed to complete the tutorial? Thanks!
You’re a genius! This is the first tutorial I found that actually worked! But please repost using code instead of images. It’s painful to retype all the code. Thanks!
You’re very welcome, Nathan! We’re glad we could help! 🙂
We have a lot more great tutorials available to students of our online classes. Take a look: [url=http://www.ostraining.com/online]www.ostraining.com/online[/url]
Kind regards,
Nick